Today is the first anniversary of starting this project. One day of project time is just about four calendar days.
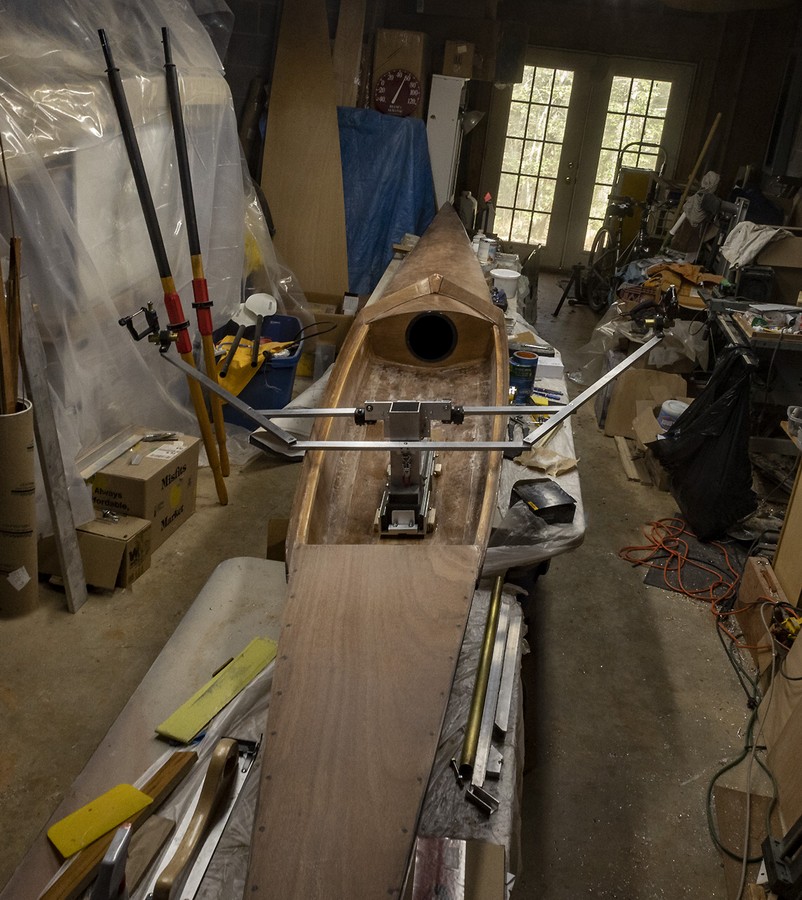
I really wanted to have the boat “completed but not finished” today and I almost made it. I got dizzy working out the light-bar clamps and tilts to mount the rigger on the vertical member of the slider, but I may have got it done in the end. At first, there were conflicts galore between levers and bars, mounts and beams. I moved a few pieces around, added a spacer here and there, and all is well enough.

A closer look and tedious details will follow if and only if it actually works.
One thing: when you use those light-bar clamps as I am using them, you must really, really cinch them down or they’ll have tons of play and creep over a period of minutes or hours. No, really, screw them down for all you’re worth. After a few hours, this seems stable, but sitting still in the yard is the least demanding test imaginable. It occurs to me that only one set of clamps is needed to adjust the angle which the riggers make with the boat. The other clamps could just as well be fixed mounts. Once adjusted, I could run a screw through them to hold everything in place. For that matter, I could do the same thing with the “adjustable” clamps. And I might.
This rig ended up requiring a few extra pieces, but despite a somewhat awkward, appearance, they added only a few ounces and brought along some function (for example, rather than pulling the detachable rigger straight down, the twin, angled toggle latches also supply opposing stresses to pull the rigger securely toward the keel-line).
I’m a little concerned that the slide may be mounted slightly too far forward. I can move the upright a few inches aft without much trouble. Beyond that things get more complicated. I recently mentioned the possibility of inserting an adapter between the deck and the slider if the slider is not positioned appropriately. The upside of this possible mistake is that as things are right now, there is really little choice about the seat position, so at least the first sea trials will be simplified, even if they are more likely to reveal trim issues.
There was a certain amount of flex up and down owing to the rubber grips in the light-bar clamps that I’m using to fix the angles of the rigger. It seems very rigid side to side but had more play than I was comfortable with up and down. I added a third (!) toggle clamp on the opposite side of the vertical support to pull down on the underweighted side of the rigger. This helps immensely: I think it will all stay in place and it is has far less vertical “bounce” at the oarlocks. I got things upside down, backwards, wrong side up, and put holes where they did not belong. Call the extras “weight saving.”
Day 94
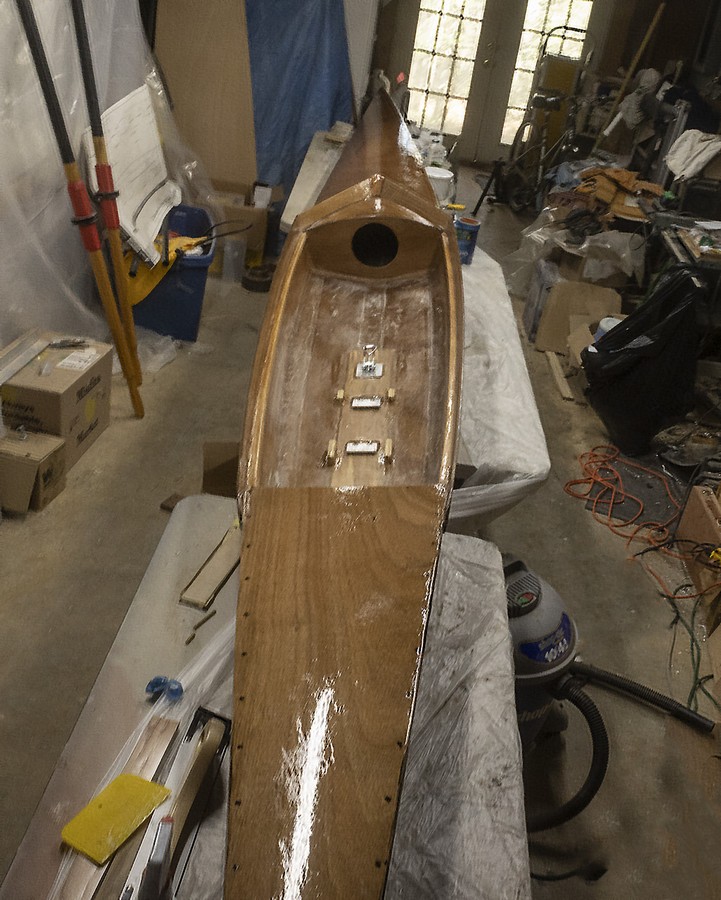
One last very thin coat of epoxy — traditional marine resin, clear hardener — is in place to restore the wood-grain of the thoroughly sanded fore and aft decks. I applied 80 grams, mixed. The “office” needs a similar coat, and I will probably do that tonight. The shop temperature is only 58-60F. Varnishing is the only large task left, and I am putting that off. Seat and stretchers will go in as soon as I decide either where they go or how to put them in temporarily.
Seat and stretchers to go, once I pick a spot.
Finish will involve one more coat of epoxy and some varnish.
rowing machinery mating hardware is finally visible.
The slow-curing clear epoxy I applied at 1:30 this afternoon was still slightly tacky at 11:00 this evening. I went ahead coated the interior. It’s probably going to take some painting inside even if I elect to leave the hull “bright.” I’m thinking white for the inside bottom of the office and everything else natural with black borders where the excessively wide fillets frame the bottom and sides of the bulkheads.
Day 95
I’ll wait a few days, maybe a week [maybe longer; there’s no hurry and at least one source advised “a few weeks”], for the epoxy to fully cure before embarking on an adventure in varnish. I go back and forth about the office paint. The latest epoxy coat looks good in there. So hold that thought. Again. I added another modest coat inside after knocking out a few egregious drips, drops, and inclusions. Sooner or later, I need to clean up the shop, put down fresh plastic on the work tables, and sweep the floor in an effort to give varnish half a chance to dry cleanly. I’ll do all that after the next, final, epoxy buffing session, still some days from now. In the meantime, the trim paint around the bulkheads needs to be in place before opening the varnish cans. Flat black enamel for trim should arrive with screws for the inspection ports [3/25: screws are here, #8, 1/2″, brass, Phillips, flathead — perfect]. J. B Weld needs to be applied to the open ends of the rigger arms and braces. A temporary seat and temporary stretchers need to be provided for (temporary because until it floats, I’m not sure precisely where they go). So, see? There are several useful chores to finish before varnish is the unavoidable next step.
Day 96
The mount for the stretchers (is it “stretcher” or “stretchers”?) finally becomes clear. I’ll probably render it/them in wood in temporary form and in aluminum once needs are clear. A few hours on, after messing with an astronomical widget, simpler plans came to mind. Lord knows what I’ll actually do, but you know there will be photos.
Earlier today, I surrendered to my Halloween impulses and bought a rowing costume (a “Rutherford College” hoodie and a “vintage” SHHS Hilltoppers baseball cap). At least I didn’t find a corded, white wool cardigan with sleeves I could loop around my neck while calling Amy “Buffy” — but it wasn’t for lack of looking. Nobody has to know that “Rutherford College Founded 1793” refers to the township nearest my residential boatyard and not to a toff and going school. “SHHS” is Science Hill High (I am class of ’73; an earlier incarnation of the school sat atop a tall hill in metropolitan Johnson City, Tennessee). The seller who called this cap “vintage” also dated it to “the 90’s.” We shall have words if ever we meet.
Day 97
From the beginning, I intended to frame the bulkheads with a black border so that I needn’t worry about shaping beautiful fillets in such a highly visible area. I buffed the epoxy on and adjacent the bulkheads tonight, put down some blue tape, and applied flat black enamel as intended. I’ll give it a day or two to dry then apply varnish in those areas. Alas, now that the paint is on, I’m not so sure about this scheme. The nice thing about a homebuilt boat is that pretty much anything can be redone, so I will proceed apace and hope for the best. I’ve prepared four swatches on some epoxied plywood trimmed from the deck so I can preview what varnish does over a similar surface with paint that has dried under the same conditions for the same length of time. With some luck, varnish will improve my impression of the paint scheme by imposing a uniform texture throughout the area. Varnishing the bulkheads (and maybe the rest of the stateroom / office / cockpit / sit-space too) will give me practice with a famously finnicky coating before tackling the decks and hull. At least, I’ll finally be able to attach the inspection ports. So there’s that little bit of finish in sight.
Day 98
I was not happy with the black edging on the aft bulkhead. Varnish (Epiphanes RapidClear satin) made things worse. I spent this morning scrubbing and sanding it off. What acetone would not remove, sandpaper and acetone almost did, and what that could not remove, a new fillet could cover. I’ve been making fillets too robust, so I mixed up enough epoxy (traditional marine + clear hardener) to recoat the bulkhead and then mixed in enough wood flour to bring the remains to the famous peanut butter consistency. Altogether, I mixed up 30g of epoxy and clear hardener. I still had a little left over after covering the lower edges of the aft bulkhead with a generous fillet. An hour and change later, the epoxy had set sufficiently that I could smooth it. A few drops of rubbing alcohol on my fingertips was just the ticket. I think it looks great. If it doesn’t, I will deal with it tomorrow. The forward bulkhead is much neater even with the black edging. Maybe if I matte it sufficiently, it will do. Anyway, that bit of paint can stay for now, and I know how to deal with it if it bugs me. In the meantime, restart the clock on waiting for epoxy to cure so I can give varnish a good try.