Epoxy is finished! Except (there’s always an “except”) for the wooden parts I’ve yet to make to attach the rowing machinery to the minideck and the bonds to hold some of them together. [Not so fast! See next day down below.]
Yesterday, I did the decks. Today, I put a conveniently-sized cardboard box in the office, flipped the boat over, and used a foam brush to apply and tip out one more coat of epoxy on the hull, too. For the record, it took about 220 grams of Traditional Marine Resin and 320 Clear mixture to coat the outside of the hull. The boatyard is 60F; this is a slow hardener. I intend to leave the boat inverted and unmolested, preferably unvisited, until Monday (today is Friday) and then get down to business cutting, coating, and mounting the mechanicals. I sneaked a look on Saturday afternoon — there are just a few tiny runs, damnit, but a lovely, clear and deep-looking coat overall. I think “restored vintage shell” is the aesthetic to which it aspires.
Varnishing can wait until this time next month in the interests of letting the epoxy well and truly cure. I have plenty of time to mess with the rowing parts but would prefer to get down to it soon in case things go wrong and require redesigning. I’d like the permanently mounted bits permanently mounted before varnishing. Tack cloths and some blue masking tape are on the way on the advice of some YouTube videos (varnishing strip-built kayaks). It’s almost time to start thinking for realz about how to get the boat down to the water.
Day 86
Y’know, I almost had the mounting for the rowing machinery figured out last November 3. Then I went off on the wrong track (metal dovetails) and when I couldn’t make the dovetails sufficiently precise I adopted a solution for that (wooden, thicker dovetails) rather than stepping back to reconsider the locking mechanism. I spent a lot of time and thought making the mechanism modular, largely to protect the project in case the scheme on which I had fixated failed.
Tonight I realized that if I could make it too simple to fail, I could do without lot of that complexity. I am pretty sure that I suddenly have a simpler, more solid, and all-around easier and better design (no dovetails, no intermediate mounting bracketry, better access to potential failure points):
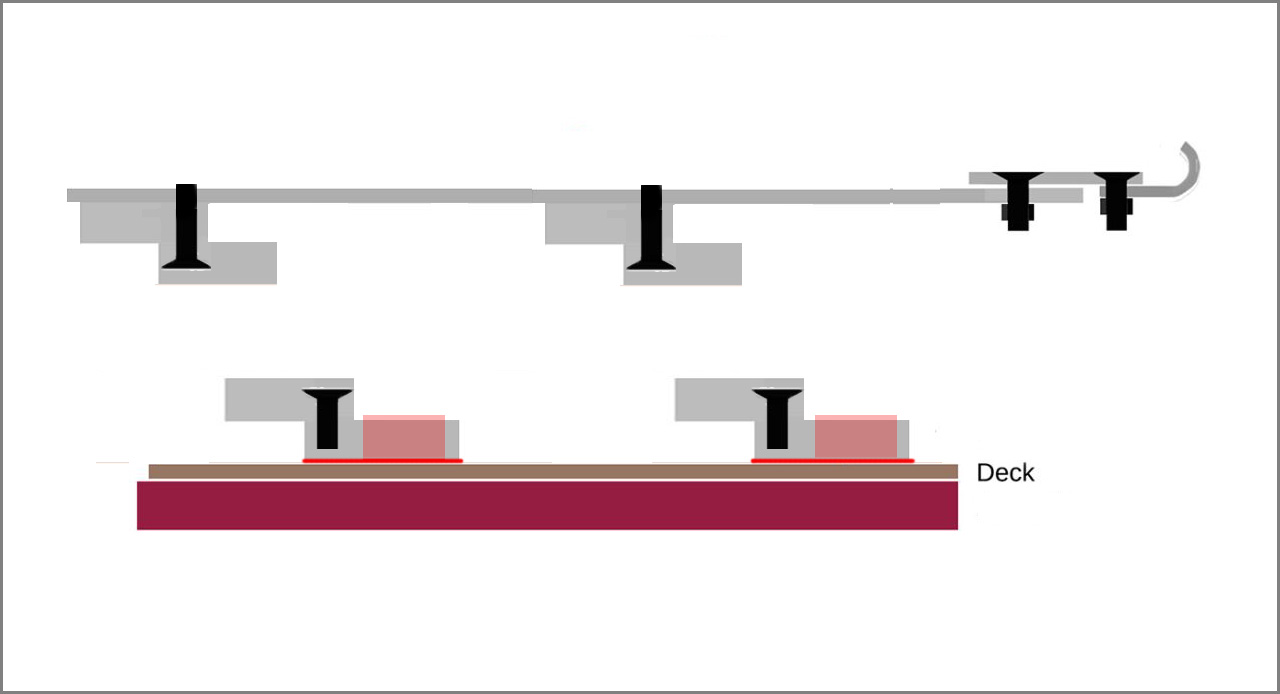
Not to scale: all the grey pieces are stacked 1/4-inch aluminum plates, each about 1.4×3 inches. Bright red again represents epoxy bonds; lighter red is epoxy-saturated tape and/or epoxy fillets. Provide relief on the edges of the bonded portions so epoxy can overlap the metal and so saturated tape would have no gaps or sharp bends. As for the mating clamps under the drop-in machinery, if there’s room for nuts on the top structure, use ’em. [During a show and tell with Chad, I noticed an issue: remember that the slide has to pass over the toggle bolt; not shown in the drawing above are needed spacers between the upper clamps and the slide.]
Day 87
I cut, drilled, tapped, and countersunk (“sank?”) pieces for the mounting scheme. While laying it out for a casual proof of concept, I discovered that these latest notions depend on the minideck being flatter than it was (else one bracket may be nicely snug while the other can be a bit loose). I sanded the lumpy, unleveled epoxy on the deck aggressively (orbital 150 then long board 120) and applied one more layer (traditional + 510 fast) letting the epoxy dust provide some “filler.” I may need to sand it a bit more, but I’ll clearly have a better working surface. I’ve only made half of the mating hardware, the parts that will attach to the deck, since the parts that attach to the bottom of the rowing machinery could be done a little differently. I don’t know that they ought to be, but they could be, and I suspect they should be, so let’s see how this comes together before proceeding. Look for drawings, notes, and photos if it seems as if it’s going to work.
At long last, I am out of small mixing cups and can see the end of the foam brush supply. My stockpile of 3/8-inch flat head screws appears endless, but they are not quite long enough (some key pieces of today’s widgets use 1/4-20 threads tapped into aluminum, so I want to grip all the threads). I’ll make do with substitutes for the little green cups (honestly, how much more epoxy will this project use?). Wider brushes (better for varnishing) and 1/2-inch flat head screws are on the way. I expect to dry fit all the mounting hardware on Tuesday (day after tomorrow) when the screws arrive. Just one whiff of success then and things will be mounted for the ages soon after.
Later that same day. Look. I’m getting really tired of streaky, spotty, wavy epoxy. The aft deck is a mess, and it was the good surface last week. The foredeck has a few scratches in its finish from turning the boat over prematurely, but nothing serious. So. I hit the afterdeck with everything: orbital sander with 80 grit, long board with 120, wet, dry, and damp, then ScotchBrite pads. I mixed up 40 grams of resin plus clear hardener and put about as thin a coat as I could over the aft deck, the better to keep it from drawing up, beading, streaking, etc. I kept the damn edge wet, I tipped out at right angles, I didn’t drag the foam brush over any sharp edges. I applied all the YouTube lessons I could. For comparison, I did zero prep on the foredeck when I used the leftover epoxy to recoat the roughest bits. I swear, this is it. After this, I’ll scuff with ScotchBrite and apply semi-gloss varnish. If that’s too shiny, I’ll spring for satin or matte varnish.
One day on (18-20 hours on), I thought the surface was still alarmingly tacky — did I screw up the mix? I wiped a small section down with an alcohol-dampened paper towel and the matte finish behind it felt solid. OK, so maybe it was just a surface thing. I went over everything with a ScotchBrite pad, found a couple of runs and some rough spots that begged for wet sanding with 150 and 320 papers and then finished them using ScotchBrite. That worked, or seemed to. I made one more pass with the pad, telling myself that either there could be a film of uncured epoxy that needed removing (could there be?) or at least that the roughened surface and its fractally increased area would promote curing. Whatever. I am leaving it alone for at least another day before panicking. If it’s at least not-tacky tomorrow, then I’ll wait a few more days, and then think about varnish. If it is still tacky, then I’ll sand and coat again.
The clamps need to be finished, so it’s not like these literally superficial concerns are holding up the show.
In the evening, I went downstairs to look things over. I saw some very rough bits under the forward coaming and went after it hard with wet 150 paper. I finally got that right. Here I am, surrounded by expert wood workers for miles around fumbling my way through a wooden boat project and only TODAY, TODAY! do I discover that wet sanding is not only a thing, it is THE thing. I’m guessing that my buds thought I already knew that and were just being polite by not telling me about it.
So I gave in and did more sanding (it is not possible to walk by a wooden boat without doing something). Tonight I’ve been wet sanding with 150 paper by hand and following with ScotchBrite pads. That is much too great a gap in grit, but it feels useful. The result on the epoxy coats on the decks is amazing. Tomorrow, I will put 150- and 220-grit discs on the orbital sander, spray down the deck, and set things right. Follow that with a ScotchBrite rubdown, fresh plastic on the tabletop, and a tackcloth massage. Varnish ought to come next. “Next” does not mean “right away.” It means “in a few days when everything is well-cured and 100% dry” and I am really certain that I don’t want to paint more epoxy on the decks.
Day 88
The decks are tolerable after an hour of damp sanding with the orbital sander. I went all the way back to 80, then 150, then 220, then Scotchbrite. Ear muffs make sanding far less onerous (likewise miter-saw metal-cutting). They not only make the work more comfortable, they make it easier to be persistent and precise.
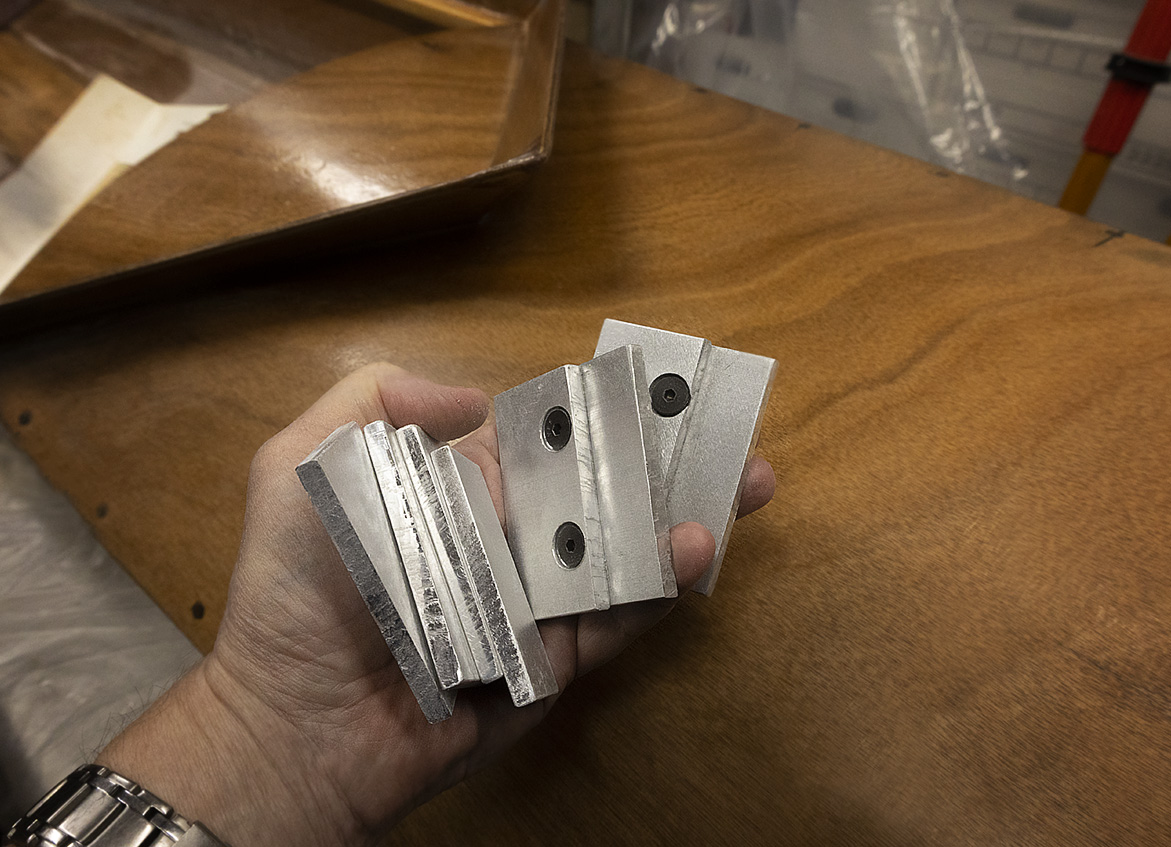
At long last, the clamps are finished! Some seat of the pants drill-press work following lots of test fitting, careful center-punching and scribing, and truly dizzying spatial relations went into fitting those dominoes together as intended. The result is tight and neat. The best, most-plausible position of the slide has yet to be decided so the boat-side clamps are not locked down to the minideck yet. I’ll use fillets and epoxy-saturated fiberglass when I get down to that, probably with a couple of holes all the way through from deck to tape to promote epoxy’s grip. Mounting the toggle clamp lower and using a thin fender washer above the upper clamps combines to allow the slide to just clear the toggle clamp’s tallest hardware. The clearance is much less than I would have dared design, but the mounting scheme is the very embodiment of “keep the mass low for stability.” So take the win. Late that night (and over the next morning’s coffee), I rebuilt attachment bits where the toggle clamp engages the slide (I must have been very tired and eager to be done with it the day I did that).
Now. Paint: I am undecided about the hull color. I plan to launch with the hull natural (“bright” as they say), with a couple of coats of varnish in case I am slow about deciding what to do “for real.” A flat white hull beneath a natural deck and splash box remains appealing. This does not have to be decided now or even this year. Neither the primer nor the paint is cheap, so I’ll wait until I am sure (enough).
I still need to work out stretchers. And exactly how I want to mount the rigger and its supporting structure to the slide. There are lots of options; none are difficult; I just need to pick some, buy some bolts (always), and get at it.