First, the “traditional marine epoxy” had not set decently even after 16 hours and even after aiming a space heater at it (it’s down to 66 in the shop). But when I went over the suspect surface lightly with some sandpaper, the remaining finish was fine. I gather that I slathered it on too heavily. And the mix proportions as well as the mix itself may have been too casual. The next batch will be done just so.
Second, I drilled and mounted my too-cute-by-half dovetail notions three times. Each time was not necessarily better than the previous time. One advantage of overthinking everything is that plans B, C, D as well as X, Y, and Z are right there just waiting to be sent into the game.
I could use a Losmandy cradle (or a knock off) of some sort and a D-plate. Or I can forget dovetails of all sorts and try something much simpler. Here’s one possibility (another, which I still kinda like, involves steel dowels and holes).
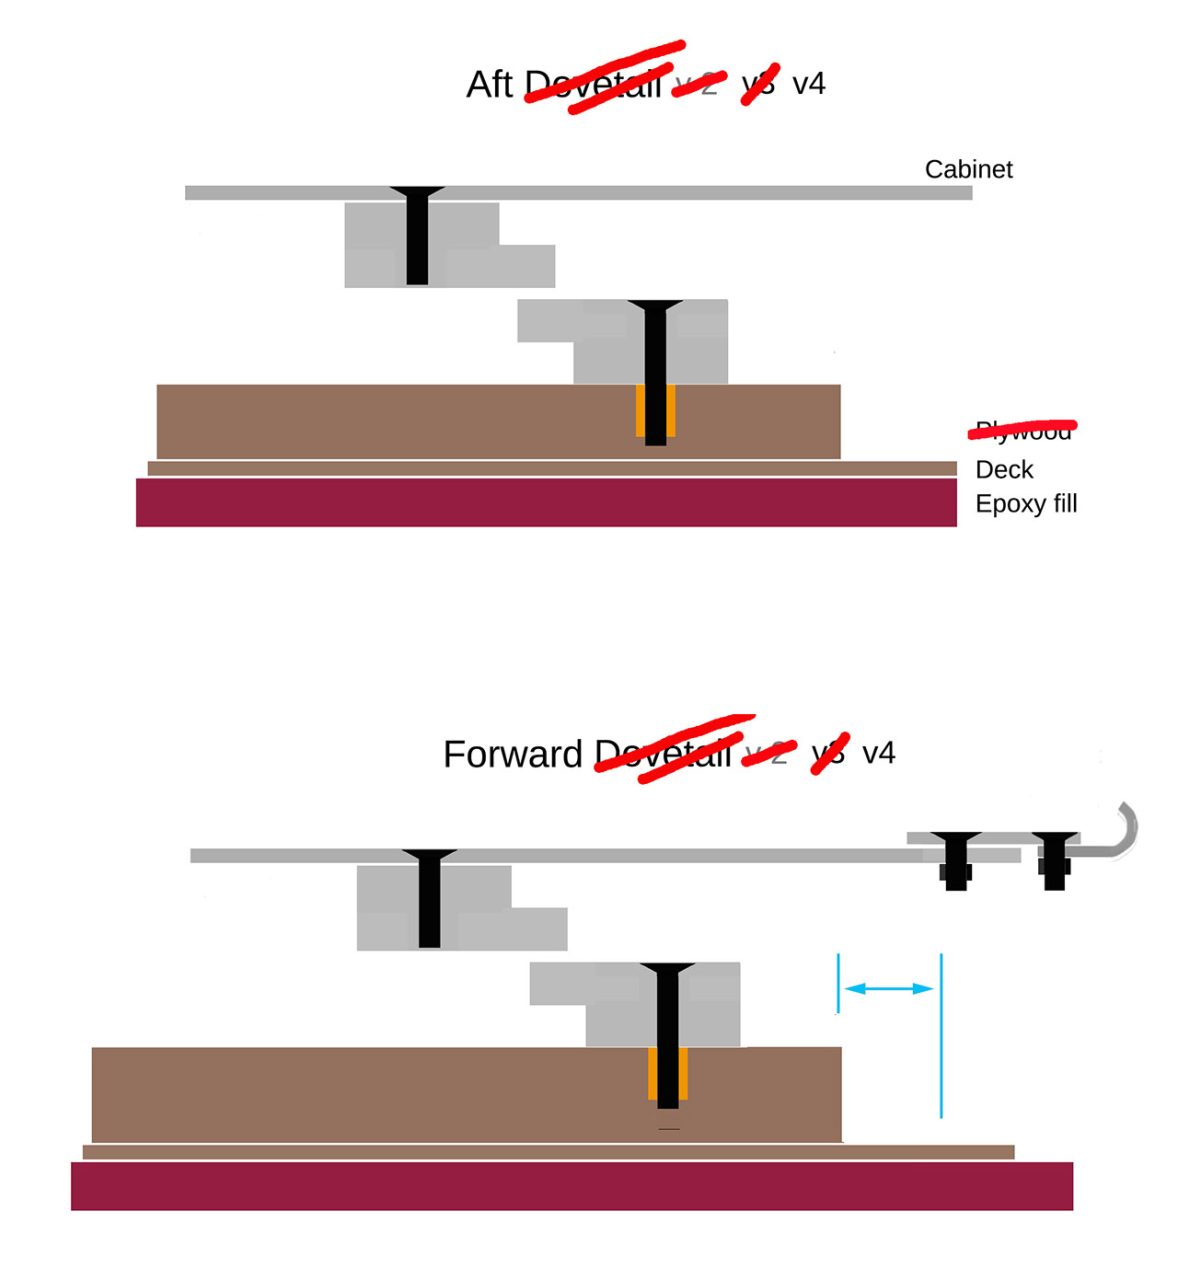
Fortunately or un, while taking things apart to try a new idea, I discovered all or most of the issues with the dovetails. I re-torqued some nuts and bolts, and now I think that when everything is under tension from the toggle clamp, the split dovetails will actually work. So I’ll keep these alternatives in mind, but will proceed along the previous path to glory. As you were.
The more I think about making sure the mounting blocks stay where I want them, the more convinced I am that I’d be insane not to spend $20 for the structural hardener for the marine epoxy system, especially since misgivings linger about the 320’s performance yesterday. “Fast” hardener (item 510) requires just a 5:1 mix, so a pint will be more than enough for all remaining structural tasks. It’s on the way from MAS and will be here late this week if the past is any guide. Bits to do the slide and rigger up a little better will be here on Monday.
Day 80
I would like to say: threaded inserts are not the way to go, at least not for the applications I had in mind for them. They demand precision whether or not it is otherwise mandatory; and they are damned hard to put exactly where I want them. In the end, I opted to bore 5/16 holes for 1/4-inch bolts; counter-drill 1/2 inch holes coming the other way, and insert hex nuts (which have to be jammed against the walls to tighten), and then jiggle everything until it comes together. Epoxy will eventually hold all these moving parts in place, but this allows a good bit of literal wiggle room to help things fit. I think I drilled 24 holes trying to put a handful of bolts where I wanted them before making that change. Now at last the drive pieces look and feel more or less right. By the time the structural hardener arrives, I’ll be settled on exactly how and where I want to put things to stay. It’s going to work out.
Day 81
Which is actually several days after that nice thought at the end of Day 80. I am still dwelling on how to fasten the rowing machinery to the hull. I need to decide on the right number of “indirections” to prevent attaching it in a way that, should it turn out to be a mistake, will not be a permanent part of the boat, but will be rock solid.
So after much (too much) thinking about it, here’s where I am. To the plywood mini deck plate, attach an aluminum plate [no! keep reading] for the ages (epoxy, screw it down, glass over it, whatever it takes). In that plate, set four permanent, stainless steel studs made permanent by whatever means short of welding seems practical. Then attach to the studs whatever mating hardware seems appropriate: something that will bolt to the studs and accept the rowing machine. If I make any dreadful mistake in the mating hardware, only the adapter and maybe the bottom of the rowing machine need to be addressed. The boat remains solid with a minimal, universal mounting plate ready for the next try. So says my shower and falling asleep thoughts tonight.
Now, what combination of metals should be used for something that’s going to get wet? Ideally no “combination.” Maritime parts will last best if they are all steel, or all aluminum, or all brass. Galvanic corrosion needs to be considered for this and for some hardware I’m already committed to. When parts made of steel and aluminum are connected, the aluminum should corrode. Presumably, if knew more about this, I could attach magnesium anodes and carry on. Is this a non-issue in this application? Or does this require more reworking than I want to think about?
Alix Solvig, on Row2k dot com, takes up the subject. It matters to metal sliding seat components. “What I think is the best is called TEF Gel. It’s super sticky, and prevents walling and galvanic corrosion with similar metals. It’s not cheap, but it can definitely save you a lot of money in the long run. A cheaper alternative is Lanocote; they’re both sticky, and won’t wash off. They’re hard to remove from your hands but they’re great, great products, and well worth it, and almost mandatory in saltwater.” Neither is particularly expensive for a fleet of one.
“Nylok” will apparently provide both thread locking and galvanic protection, but vendors are yet to be found.
There are plenty of magnesium bits for other boating applications, but they’re not cheap if needed in multiples, and I’m not sure where and how they ought to be attached.
Maybe I’d be better served by using a plywood / epoxy / glass plate to mount things to rather than the aluminum plate mentioned a couple of paragraphs above.
Day 82
Yes… I’ve slept on it twice and each time I’ve awakened more certain. The entire attachment hardware should be well-protected (epoxied, maybe glassed) plywood with no metal to metal connections. Attach three blocks to the small deck: two for drop-in attachment points and one for the toggle bolt to hold everything tight. That much is part of the boat, and as such it should be built for the ages without anticipating repair or replacement. The mating hardware should be attached to a removable — not casually removable, but removable just the same — platform that bolts to the fixed blocks. To that platform, attach dovetails cut from 3/4-inch ply, well-epoxied. And from there, proceed as before, attaching mating dovetails to the bottom of the slider using bolts or epoxy or both. Remember that everything except the blocks on the deck of the boat can be replaced or repaired fairly easily. This arrangement should eliminate galvanic corrosion on anything associated with the hull and also avoid the paralyzing need to anticipate every single future failure or eventuality.
It makes sense in my head. If all goes well, the blocks attached to the deck never move; the “platform” goes in once and stays there except for an occasional (seasonal? yearly?) inspection or adjustment; and the “cabinet,” which is part of the drop in rowing hardware, gets installed and removed with every voyage.
God forbid., here come more drawings.
Top to bottom: the bottom of the “cabinet” that holds the sliding rigger; the “platform” that adapts the cabinet to the deck; the deck with its permanent blocks (bolts are obviously removable); and how it all fits together:
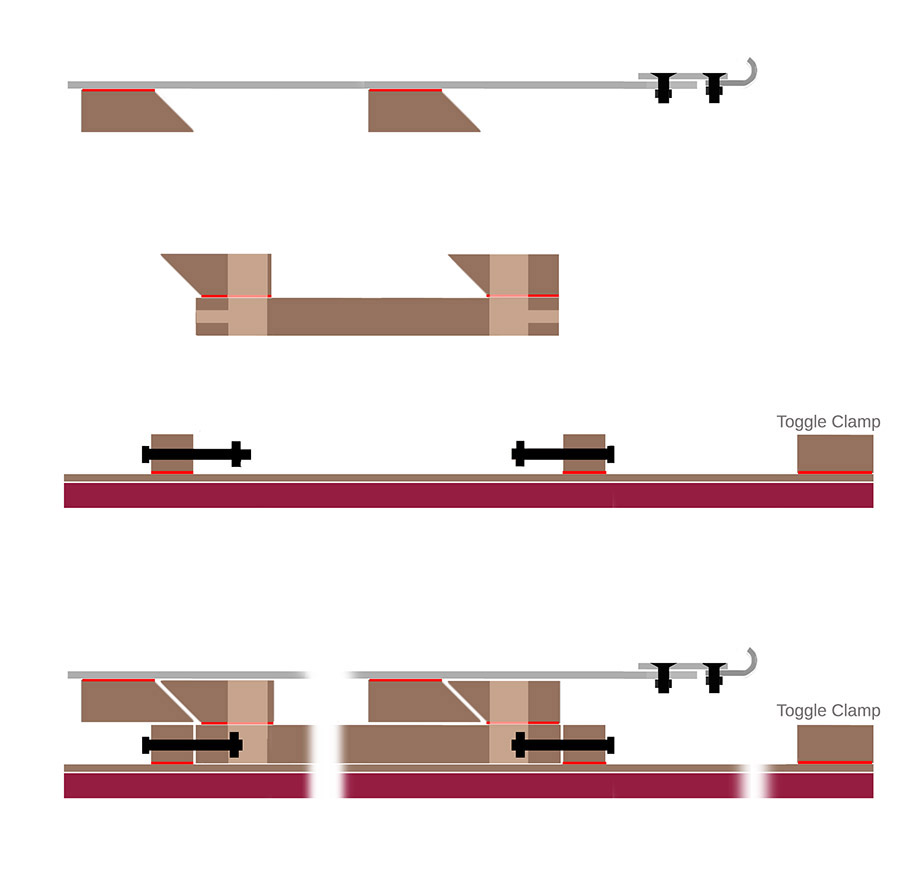
The bottom diagram showing all the structures as they fit together acknowledges that I haven’t measured anything in the horizontal direction, hence the fuzzy gaps. Those ought to be in the component sketches as well, but I’ve omitted them for simplicity. Bright red indicates epoxy bonds.
The lighter shades within the plywood pieces denote access holes drilled to allow access to the nuts on the ends of the horizontal bolts which hold the platform to the deck. That attachment is obviously a potential failure point, but it will be possible to inspect it every time the rigger is attached. The entire platform ought to be easy to rebuild or modify as needed (say, with steel inserts, or from different materials altogether).
Now, if it all still feels solid in my head for another day or two, it’ll be time to make sawdust. [Springtime: as I review this, I’m thinking about different ways to handle that lowest level with the bolts. I never cared for the access holes. The scheme is solid, the details evolve.]