Scroll to the bottom for a flash of sanity.
That didn’t go well. I measured and cut off one oar shaft, set up a drilling jig, and put a pilot hole about 4 inches into the discarded end of the shaft — for rehearsal, experiment, and practice. I chucked a 1-1/8 inch forstner bit into the drill and made zero progress and considerable mess. I drilled a series of larger holes using twist bits up to 1/2 inch. Then I tried the forstner again. Predictably, with no appropriate pilot hole, the result was a bigger mess. But also no depth. I called off that effort for today and regrouped. I considered buying a 1-1/8 spiral bit with a 1/2-inch reduced shank that I could turn down to fit the 3/8-inch chuck. I considered using a steel 3/4-inch dowel to attach the blade. I thought about shaving the shaft down to fit the blades. Then I walked away. I didn’t want to plunge ahead with some half-baked Plan X for the sculls. I want those 1-1/8-inch holes in the shaft or some well-considered alternative. My next trick will involve a step drill bit which maxes out at 1-1/8 inches. For depth, I’ll use a bit extension. I didn’t see anyone doing this to put deep holes in wood, but it seems like it ought to work. The bit and its extension will be good for something later (the rigger attachment to the upright on the slide comes to mind) even if not for this. The prospect of saving $400 (at least) on sculls licenses a lot of tools, toys, and experiments.
Day 52
That didn’t work out, either. The step bit gnawed a nice cavity in the end of the shaft and then declined to go any farther. So much for Plan A.
Plan B involves using a 3/4-inch aluminum tube as a dowel. It will require a 3/4-inch hole in the inboard oar shaft and some sort of plug of shim on the blade end of the “dowel.” I tried a 3/4-inch spade bit, which did, in fact, make some progress. I was nosing around the lathe looking for ideas when I found a 3/4-inch spiral bit with a 3/8-inch shank. Surprise! I thought all my bits larger than 5/8’s were Morse tapers for the lathe’s tailstock. Just for giggles, I put the 3/4-inch spiral bit in the extension that came today with the step-bit. The bit cut very nicely, and the combination gave it plenty of reach. Then the drill’s battery gave out.
OK, look: Plan A’s huge, deep holes in the old oar shafts are not within this drill’s portfolio (at least while I’m driving). I shopped up but did not buy a more powerful drill with a 1/2-inch chuck and a suitable 1-1/8 bit. I can’t think of another current or anticipated project that would need either of those things. Plan B is not all bad. If I go with a 3/4-inch hole and aluminum tube studs, then there will be more of the original wood to hold everything in place than if I do somehow excavate a 1-1/8 hole for the adapter sleeve.
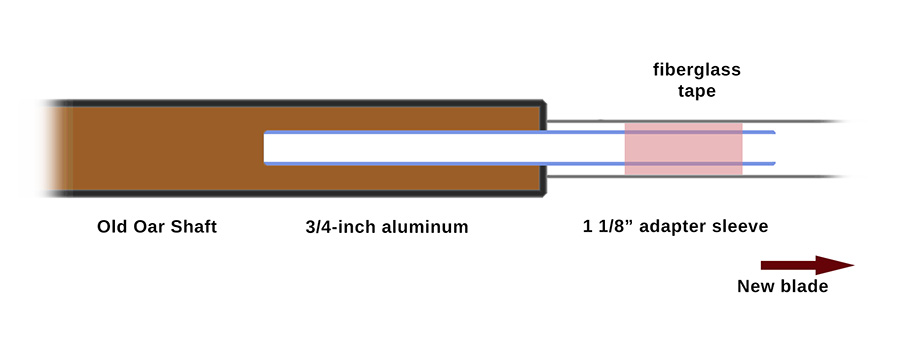
Nothing is to scale in that drawing, and the details of what happens at the point the aluminum stud enters the old shaft are omitted (and, actually, still to be worked out), so don’t measure it or take it as gospel. Wrapping the aluminum stud in fiberglass tape and epoxy will give me an arbitrarily tight fit within the adapter sleeves to which the new blades will attach. Some fillets on the outside and a glassed cap on the aluminum tube will keep water from finding its way to the inside of the old shaft. Wrapping the 3/4-inch aluminum tube with 4 feet of the fiberglass tape on hand produces the 1-inch O.D. plug/shim to fit inside the adapter sleeve. Go big and then sand that item down to size, finishing with more epoxy. Add a collar of epoxy at the junction of sleeve and old oar to take some of the stress off the fiberglass plug. This may be Plan B, but it feels pretty good tonight.
Day 53
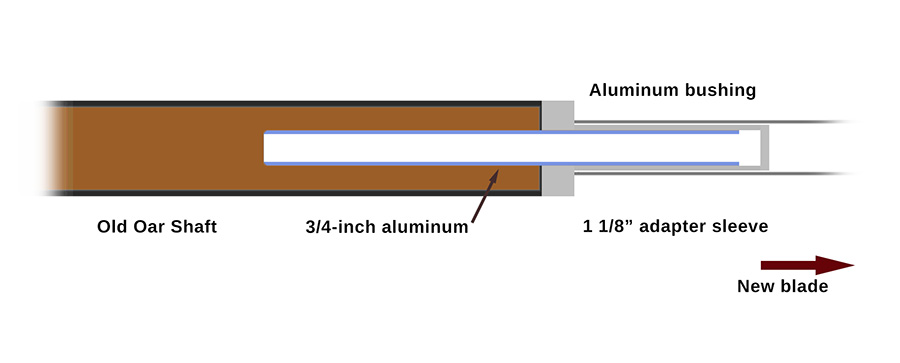
But it really didn’t age well over night. Now I’m thinking about Plan C which will require some lathe work and much less epoxy. Just slather some on all the mating surfaces:
In other news, initial experiments with the 360 action camera were a hoot. Walking Gemma through the woods made a good exercise for filming and editing. Her aversion to all things stick-like made videoing challening, and a 2.7 meter carbon-fiber pole is nightmare stickish. None of the technology came up short.
I plunged ahead on Plan C by using the chop saw to cut through one 10-inch piece of 2-inch aluminum stock to make two 5-inch bushing blanks. That produced a lot of heat. Ask Fourier. While the metal cools, I planned for what I wanted to happen at the lathe: drill a 3/4 inch hole not quite all the way through; reverse the blank; make an indent and snug up a center, live or dead. The turn the bushing down to the needed O.D. to fit the I.D. of the adapter sleeve which is 1.00 inches. That’s one. Then do it again.
Reality intruded. Again. I cannot for the life of me get a clean cut out of any of my lathe tools to take the bushing’s diameter down to 1 inch. I can nibble or gnaw several thousandths at a time, but the piece is unstable in the chuck, wobbles under the tool, bites and hangs and climbs out of line at any real contact. Excellent machinery will make up for some lack of skill; excellent skills will make up for over-stressed tools. But you need one or the other. I’m a duffer and to pull off Plan C on this lathe requires more finesse than I have to offer.
I’m now down to seat of the pants stuff. Calling my next trick “Plan D” suggests more of a plan than there is. Epoxy is shown in red:
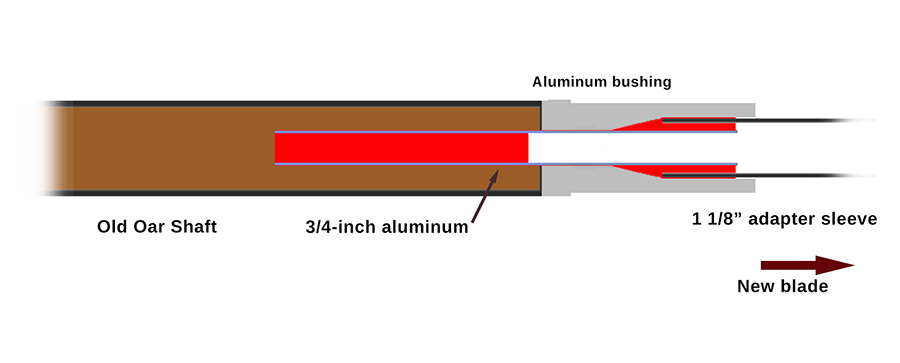
Here’s what’s worked so far. I think it’s enough to get the oars done. Push the 3/4-inch hole all the way through the 5-inch aluminum blanks. Drill part way, turn the work around, finish the cut in the other direction (because you can really only go as deep as the flutes, else shards jam up the works). Drive a 7/8-inch hole about halfway through from what will soon be the blade end of the blank. The 7/8-inch pass might not be strictly necessary, but it can’t hurt. Use the titanium step bit in its extender to expand the 7/8 inch hole to 1-1/8 inch (push until the second set screw in the extender is almost to the end of the bushing). It may be hopeless in the old oar shaft, but that bit cuts aluminum just fine. That will be deep enough to lock the blade adapter in place. Drill a 3/4-inch hole several inches into the old oar shaft. Fill it about 3/4’s full of slightly thickened epoxy. Drill some holes through the aluminum tube in the portion that goes inside the old oar; it will increase the already mighty grip of the epoxy on that tube. Work the aluminum tube into the epoxy-filled hole in the end of the old oar. Let it cure. Paint the exposed part of the 3/4-inch tube/stud with epoxy and set the bushing over the tube. Fill the open space between the 3/4-inch tube and the walls of the 1-1/8 inch hole with slightly thickened epoxy. Be sure all the mating surfaces are coated. Set the blade adapter in place while the epoxy is fresh and thin (consider drilling some anchor holes in its submerged portion, too). Stand everything upright until the epoxy cures. Splint or tape the joint to be sure it stays straight. Plan D is heavier than I had in mind at just the wrong place, but it will be as solid as could be. This option adds length to the original plan, so adjust whatever component lengths you need to adjust in order to get the right overall length without introducing folly along the way. I could trim the old oars shorter to eliminate some heavy wood and move the Rube Goldberg mass of my ad hoc engineering inboard; or I could minimize the length of the joinery between the shaft and the blade to reduce the torque applied by the force of my mighty stroke. Mess with all the pieces until everything looks and feels right.
Carbide lathe bits are on the way. I refuse to look at that chewed up metal for the lifetime of these sculls. Wiley mind game of an old man building a boat: waiting for the bits (just a couple of days) gives me time to consider whether “Plan D” is OK or off the rails. In any case, it will be nice to have sharp tools again after all these years. If they cut like a dream, I may need to buy more metal and revisit Plan C; it was my favorite.
Oh for Heaven’s Sake!
See all that struck out text? That’s sleep deprivation. Or creeping dementia. Or something. Geez. Look, the solution is easy and cheap. Thank goodness I can use all those tools I picked up while I was crazy.
The blade adapter is 1.125″ in O.D. and 1.00″ in I.D. I can drill a 0.75″ hole into the old oar shaft easily enough. Consider a 1.00″ O.D. aluminum tube with 0.125″ walls. What’s its I.D.? I’ll wait… It’s 0.75″ is what it is. Its I.D. will fit neatly over a 3/4-inch aluminum dowel / stud whatever you want to call it, and the adapter sleeve should fit neatly over it’s O.D. Assuming this works, and why should it not?, you can remove the blades for transportation or experimentation very casually or snap them in place for thrashing about in the water. Voila, piece of cake even if the diameters have to be adjusted with the lathe, sandpaper, or epoxy. They might need tweaking before being fitted together and epoxied for the ages, or they might not.

Simple. As. That. This saves a lot of trouble and a good bit of weight over some of the alphabetical plans. Two 12-inch sections of suitable, thick walled 6063 are on the way from an eBay seller in Colorado. That’s considerably more than I need, but the way things are going, I can’t have too much. Let’s not speak of this again.
In more good news, the 360-degree videoing and post-processing proceeds apace. Even Gemma begins to worry less about a 9-foot stick hanging over her head. Things are a little idiosyncratic when editing 360-degree footage, but that’s not really a surprise, is it?