I told you yesterday that I was a little hazy on the order of operations. The bottom panels need to be built up just like the side panels were (but with reference to the “ship’s drawings”). Maybe the instructions were meant to suggest that I could have laid up a thicker Dagwood and done them at the same time I glued up the side panels — that would probably have worked fine, but the alignment would surely have been a little trickier.
There ought to be room on the work bench to build up the bottom panels and to attach the sheer clamps to the side panels at the same time (because that step takes a lot of clamps but not a lot of room). The two after that (inserting a spreader and joining the bow and stern ends of the side panels; stitching the bottom panels together at the keel line) will surely want most of the available workspace.
So here’s the plan: attach the sheer clamps, glue up the bottom panels, stitch the bottom panels, join the side panels, trim the sheer clamps, stitch the bottom and side panels together. Then get serious with epoxy. If the first two steps can be done in one day, great.
Don’t get in a hurry, but there’s no reason to dawdle, either. Think ahead so as not to waste time and space, but don’t think so far ahead as to get intimidated.
BTW, the new, new epoxy arrived from MAS today, so I am awash in expensive resin and hardener. I’m going to think for a day or two about how much of it to return. I’m leaning toward returning all of it, although it might be wiser to give this old stuff a bit longer to prove problematic. The return window doesn’t close right away. See what you’re thinking in a few days.
Here’s today’s order of business:
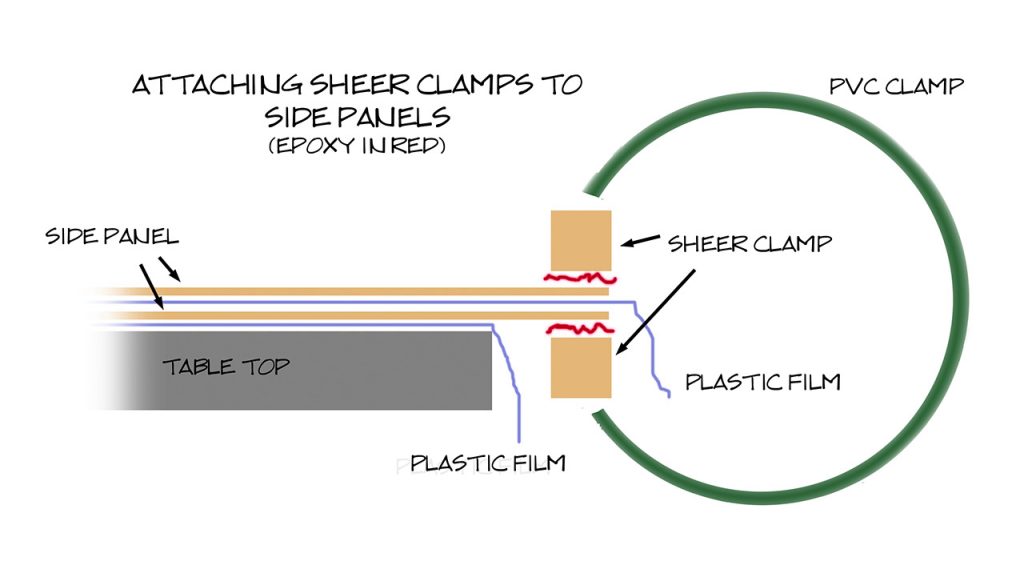
(1) Lay a sheer clamp on the work surface.
(2) Paint the top of the clamp with epoxy.
(3) Align the top edge of one side panel with the sheer clamp.
(4) Lay plastic over the side panel.
(5) Align the second side panel on top of the the first.
(6) Paint one side of a second sheer clamp with epoxy.
(7) Lay the glue-coated clamp down along the edge of the second side panel.
(8) Clamp the sandwich at the ends of the work table and in the gaps (4 clamps).
(9) Slide the sandwich so the sheer clamps are over the edge of the table.
(a) Weight the side panels so they cannot tip over the edge.
(b) Insure that all the edges are aligned.
(c) Add clamps about every six inches from one end to the other.
(d) Do or don’t do the bottom panels while these surfaces cure.
I mixed 40g of resin and 18g of hardener and used a foam brush to apply it to the sheer clamps. It wasn’t quite enough. I mixed another 13 and 7 (that’s just a little off, but it’s forgiving stuff) and finished up with that. There was only a small amount of leftover epoxy, and I painted that along the top side panel just where the sheer clamp meets it (inside the hull). I placed the first four clamps according to plan (step 8). Then I put a heavy aluminum bar on the center of the top side-panel and began a kind of binary interpolation at the edge, adding clamps halfway between the first four, then more between those eight. After that, I just clamped wherever I suspected a gap or imagined a need. At every clamped point — or at least at every second one — I felt (through my new nitrile gloves) to be sure all the edges remained in alignment. Where they sometimes seemed to want to drift away from perfection, I pushed until things were right and then used wider clamps (which are appreciably more powerful).
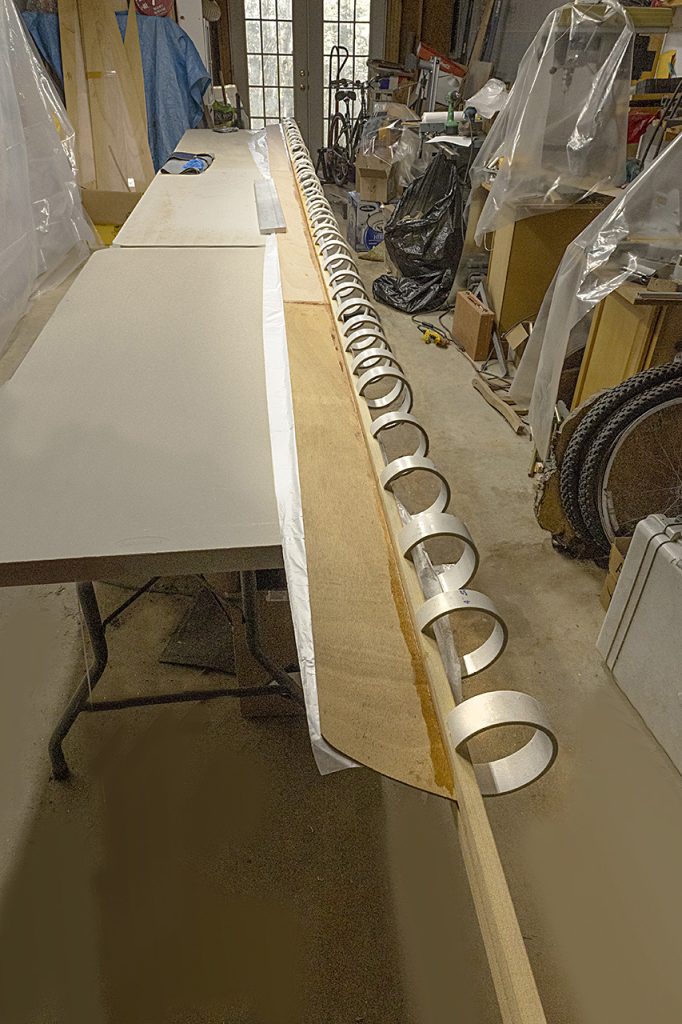
And then, with about 30 clamps in place, I tipped the whole damn thing, weight and all, right off the edge of the work tables. See the warning on step (a) above. There’s a gotcha: if the weight gets shifted too far toward the edge, gravity is ready to seize the moment — and the boat — as soon as you apply too much force to attach that one tough clamp. PVC is heavier than you might imagine; there’s more than enough right there to pull the un-ballasted assembly off the table.
The silver lining: the clamps held really well, and that’s good to know. I lifted, twisted, fought the side panels back up on the table before anything hit the floor. I expected to start over, but the panels and the sheer clamps were nowhere misaligned by more than an eighth of an inch. With some practice, you can feel when the assembly feels like a single surface, or close to it. I declamped, nudged, and reclamped at no more than four or five places to get everything back where it belonged. Adrenalin helps with PVC clamps. I attached all but two of the rest of the available clamps and cleaned up the work area just a bit.
Here’s what’s going on in these photos:
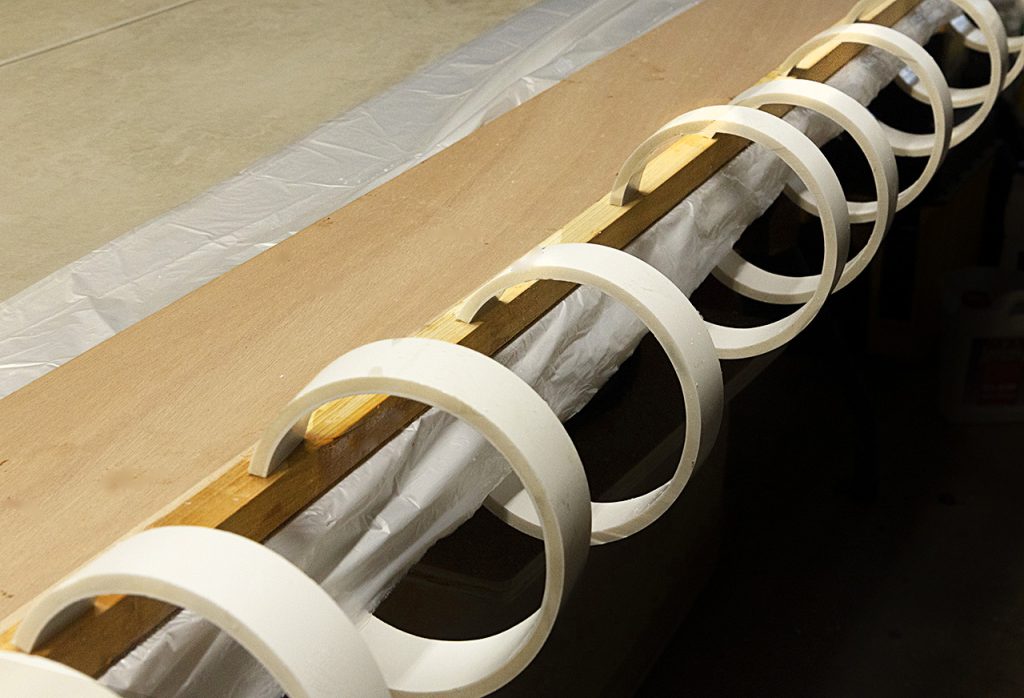
Listen: if each clamp exerts 20-30 pounds of force, and I have 44 clamps at work from stem to stern, that’s 880 – 1320 pounds holding everything together. No wonder my hands are sore: I had to lift, pull, wrangle with more force than that to get them attached, and with this clamp design, I have zero mechanical advantage. The epoxied surface is 3/4 inch by 20 feet times 2 or 270 square inches; so that comes to only about 3 to 5 pounds per square inch — is that enough? It’s plenty! Read on.
An Engineering Epiphany: Eoceanic.com notes that “resorcinol and other urea-formaldehyde” glues require 7-14 kg/m2 for wood bonding; epoxies actually require none. In any case, 7 kg/m^2 is on the order of about one ounce per square inch. Clearly, my mind hasn’t been right: the clamps hold the pieces in the proper relationship while the epoxy cures, but they do not facilitate the bond itself. If I were using a glue which required compression, these would provide much more (50-100x more) than required.
Let’s not try to combine steps today. All this took about an hour and a half (not including reading and planning), and much of it was fraught. Thank goodness for slow epoxy. Later, I’ll take a look to make sure nothing has relaxed too far from ideal. (One two-foot section seemed less than 1/8-inch out; I’ll surely sand or plane more than that. And notice that in the wide-angle photo, it’s clear that the extreme stern does not have plastic between the side panels to prevent adhesion if epoxy happened to seep between them. It does now.)
Tomorrow
I’ll glue up the bottom panels while I let this assembly cure a little longer.