OK, make some choices. Get it in the water. I bought some hardware at Lowe’s today, and when I got home I installed the eye-bolt that will anchor the bungee cord I intend to use in place of the inclined plane that sliding seat arrangements use to reduce effort during the recovery phase of the stroke. Later, I ordered from Amazon 10 feet of bungee cord and two small stainless steel carabiners to complete that notion. There should be plenty left to make an oar keeper, too. Maybe it’s even the right kind of cord.
It’s time to build some stretchers and mount them where I imagine they go. Come close, make them reasonably adjustable, be prepared to remount them and patch the holes. Just do it — re-placing them as needed will be easier than continuing to worry about it. If the whole scheme is mistaken, well, I’ll get it right next time. I have way too many ideas about this, far more than are needed. Pick one, build it.
Day 105
Done. I made stretcher mounts from some salvaged aluminum tubes and another pair of light-bar clamps. I made use of the forward bolt holes that hold the upright to the slide. Some square aluminum tubing provides mounting surfaces for wood “soles.” I know that doesn’t make any sense to read, and I hope the following photo helps some.
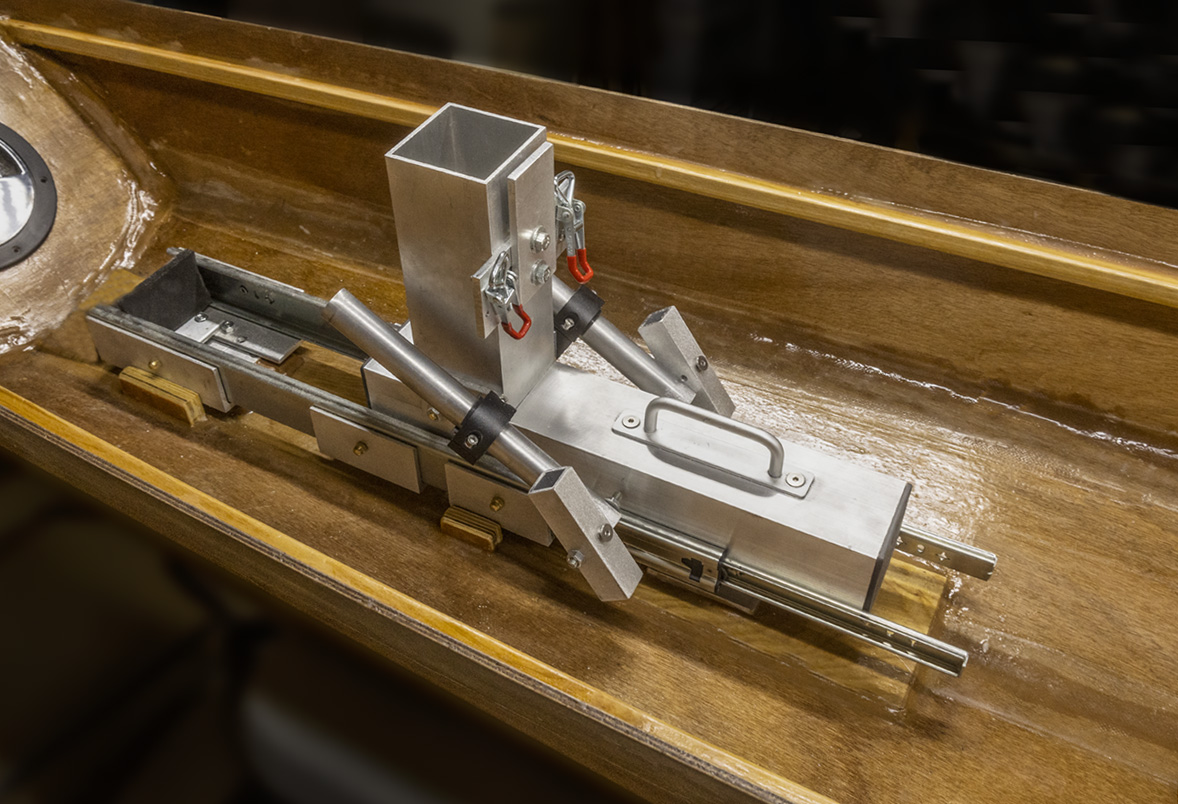
The stretcher mounts are effective and adjustable but not particularly elegant.
Wood surfaces for the rower’s feet are not in place; they hide a lot of machinery.
Velcro straps are yet to go. That part is next. The wood bits (not shown here) could use some waterproofing and maybe some glass for strength. The elaborate, adjustable stretcher bits — those inclined tubes, clamps. etc — might get sacrificed after I have a good idea where the stretchers will end up.
In the same “Just get on with it” spirit, I ordered a thick pad to use for at least a temporary seat. It’s larger than the eventual seat, but ought to be both sufficient and forgiving during sea trials. It might even be comfortable. The ~18 inch range of the slider pretty well says where the seat has to go unless I find the need to make some kind of adapter to remount the slider farther forward (unlikely) or farther aft. In the beginning the seat will go where the slider says it must go, and I’ll deal with adjusting the range and with it the seating position as needed later. I’ve laid out bits of wood and some aluminum channel with which to make a first and no doubt temporary thwart for the seat.
Vanity of vanities; all is vanity, thus sayeth I, too. I mounted a ball head on the aft bulkhead to hold an invisible selfie stick. I need to install a brace for it a foot or so away. I hesitate to admit that this has been part of the plan all along.
I almost made an ugly mistake when I started to plunge ahead on the brace for the action cam mount (I had in mind a PVC ring). But the more I thought and looked and fitted, the more convinced I became that what is needed is a finished piece of wood with either two openings for the selfie stick (one straight above the mount, one that would hold the camera above the keel-line when at full extension) or one opening and an eccentric mount that can be rotated to supply either support or, simplest of all, two different braces that can be swapped out using a single hole in the bulkhead [not so fast! that’s “simpler” but it’s not “simplest of all” — stay tuned]. I have a piece of cherry in mind for this duty, but I want want to think it through and do some measurements before proceeding. And now a very simple widget that is more versatile, more easily mounted and removed, easier to make, and steadier is almost in view. I said almost. No! Wait. In the morning, I realized I can do this with some off the shelf photo bits. Less “making,” more adjustable, just as solid and as easily removed. Try to stop designing!
At Amy’s insistence, I brought the old rowing machine up from the basement. I honestly don’t know if it will help or hurt when it comes time to move to the water, but it’s done.
By Wednesday (today is Sunday), lots of little bits will arrive and allow me to finish some big and little parts of this project.
Day 106
I filled the pass-throughs with plain 1/4-inch steel threaded rods capped on both ends with rubber washers and steel cap nuts. They’re useless except as keepers, but they do prove the idea and provide examples of the proper length for all four ports.
And I put a seat in the boat. Which is less of an accomplishment than it might be since it is seriously hacked: over-sized, wedged in place between clumsy shims and resting on a badly-measured, seat-of-the-pants framework. But it ought to do in the beginning to figure out where the real seat should go.
Stretchers. I cut a couple of small plywood “cards” and a strip of wide Velcro for each enough to loop over feet or shoes, water or land. Screw the cards to the stretcher attachment bits with the velcro between the attachment and the card and call it done. It’s really dirt simple. Is anyone surprised that I, of all people, would have overthought things so obsessively?
I’m Out of Excuses.
Unless I can think of something else that needs to be completed, it’s about time to get it down to the water to see if it floats.
Oh: the inspection ports need to be installed (done!). Heel stops on the stretchers (done). J. B. Weld needs to be applied over openings in the rectangular tubing of which the rigger is comprised (done). I need to provide for the supplemental bracket for the action cam / comedy recorder (that will take five minutes, ready when you are C.B.).
I started putting things away, and for a moment I was a man standing beside a wooden boat with a can of varnish in his hands. So I did what had to be done (Epiphanes semi-gloss; it will be cured about the same time the epoxy-coating of the stretchers allows them to be reinstalled on the slider.) So, done.
April 26, 2023.
There’s still the matter of getting it the water, but that’s not really “building the boat.” (See below!)
Almost.
I put the stretchers in after epoxying them for strength and water resilience and promptly discovered that my feet won’t fit where I thought they belonged. And even if they did fit, there would be zero adjustability. So one last order of metal is in the works. New, simpler, saner, lighter stretchers will fall into place late next week, but to make sure they work right, this time I will actually do some measurements. Oh, the humanity!
On a land-based pretend-rowing-machine, Amy and I measured the distance from my hip pivot the center of my feet at the catch and at full extension. The extremes of several strokes suggested a range of 14 inches. 11 inches was more typical without exaggerated stretching, but I’ll build for the extremes in case they matter — just pretend I might get more flexible and nimble as practice makes me less flawed. The sliding rigger as built actually has 18 inches of range (it was built with some reference to a commercial rigger, afterall), comfortably more than the range I apparently require and enough to accommodate some long-limbed guests. However, from examining more commercial sliding riggers now that I see this one, I believe I had mis-conceived the most likely placement of the stretchers. More when I know more later this week.
Later that week: I made simpler stretcher mounts made entirely from aluminum angle stock are great improvements over the elaborate tube and bar-mount widgets, but I am still not convinced that my feet and ankles are going to fit in there as they must, one way or another. Who knew there would be a lot of subtleties about how all this should fit together (yes, I am being sarcastic; of course there are!).
May 1. Consider this the prototypical entry for a new category: “Getting to the water.” I’ve been getting the Honda ready to roll again. Until it’s properly re-registered, it’ll be good only to get to the neighborhood docks with a death march to and from the water. Once street-legal again, the boat launch just over the bridge, half a mile away, will be available. I caught a car-top canoe loader at half price tonight. I used something very much like this to carry my kayak all over the US, down through Baja and back, and hither and yon in Canada on a Pontiac TransAm, so I don’t see why this one won’t serve on my Honda. In for a penny in for another $71.62, right?
May 3. The Honda has a new battery ($90), some new indicator lights ($10), and fresh windshield wipers ($18). The instrument cluster is dead and the radio has been expelled since it kept somehow coming on and draining the battery. I’ll take care of all that in good time. It passed inspection today ($25 including another light or two) and the plate agency says I can resolve barriers to online registration in person. I hope “resolve barriers” is not happy talk for paying a lot of back-due fees and so forth, but in any conceivable event, it’ll be worth having the Honda back in service. It’s been scrubbed and waxed in honor of the occasion. (It may need a new fuel pump, but YouTube makes that $1k repair look like an easy shade-tree romp for ten cents on the dollar. [May 27. Wait — no, it doesn’t need a new fuel pump. Common misdiagnosis, apparently. It needs a new ignition switch, just the electric part, which turns out to be slightly hard to find for a Honda of mine’s vintage with a manual transmission — an OEM wiring harness etc is on the way from an eBay reseller. Put another $44 on the getting-to-the-water tab.)]
May 6. That cartop loader needs some modifications to carry a shell rather than a canoe. An inverted canoe would rest with its gunwales on each side of the center pivot bolt, but I don’t want either the top or the bottom of the shell resting on that. So the cross piece will need some extra bracketry or a ton of padding (pool noodle anyone?) which I will toss off in oak and may build for keeps in aluminum. The tow bar connection for the Honda almost cleaned up after years of neglect and rust in a damp trunk, but in the end it was easier to drill a new hole to mount the new loader than to remove the rusty threads holding the old ball to the bar. Next time I say, “The drill press will easily put a hole through that,” remind me of this: I had to work up to the needed hole using 3/8- 7/16- and 1/2-inch bits. Then I used a more generous 1/2-inch and finally a 5/8-inch drill bit. I was prepared to go bigger, but 5/8 was just enough. Half an inch (or more) of steel is tough stuff.
The receiver was really loose, and that long pole standing on it means the slack rendered the whole rig ridiculously shaky. Fortunately, slack in the tow bar receiver is a common problem with a cheap solution ($10) and a sturdy fix was only a few hours away on Amazon (installed, works great — another nut size, another deep socket). Then it’s on to a top sling for the boat, adjusting the kayak carrier for the hull, registering the Honda to make it street legal again, and, unless I can think up a good excuse, put the boat on to the lake.
May 9. A painless trip to the DMV made the Honda legal (just $44 all in with a new, current tag). I’ll need to experiment some to see what’s the easiest way to arrange all the bits to make the carrier easy to remove, and I’ve yet to reconfigure the car-top pieces from kayak to shell. I managed to gash the back of my hand (kitchen, not shop) which will make it unwise to soak it for a few days. I didn’t actually ask for an excuse but got one anyway. An urgent-care visit the next day got my hand glued up and my tetanus innoculation boosted, so at least there’s that. The PA’s advice was not to put it in the lake “until it heals” which may take a couple of weeks.